
You’re likely dealing with a broken ground wire, a faulty latch actuator, or a mis‑aligned sensor that stops the trunk from getting power or registering a full seal. First, inspect the ground wire near the latch hinge for continuity and repair any cracks; a good ground restores remote and interior switch operation. Next, test the sensor by manually moving the latch bar to the “off” position—if the dash light stays on, the sensor is bad. Check the five‑pin connector for corrosion and ensure the latch clicks when you press the remote; no click indicates a bad switch. Clean debris from the latch, hinges, and striker, then lubricate with silicone spray. Finally, reset the main trunk switch by disconnecting the gray‑tab connector, waiting a few seconds, and reconnecting. If you follow these steps, you’ll pinpoint the cause and be ready to move on to deeper diagnostics.
Quick Tips
- Inspect the ground wire near the latch hinge; a short or open circuit can cut power to the actuator and cause the “dash‑open” light.
- Test the trunk sensor by manually moving the latch bar to the “off” position; if the indicator stays on, the sensor is faulty.
- Listen for the actuator click when pressing the remote; no click when the trunk is partially closed indicates a bad switch or wiring issue.
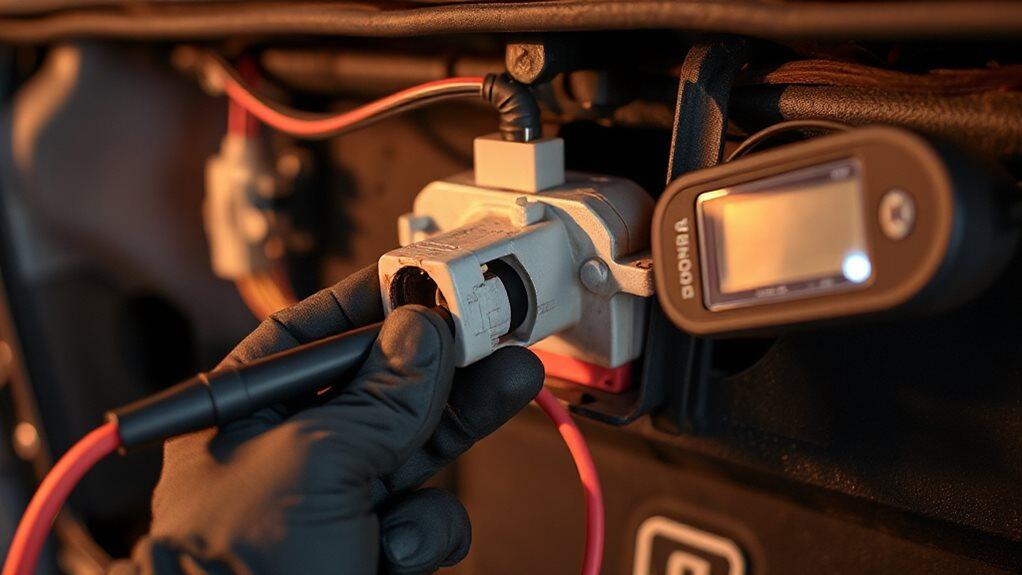
- Verify all connector pins and the five‑pin latch connector are secure, corrosion‑free, and properly seated before resetting the system.
- After repairs, reset the trunk switch (disconnect gray‑tab connector, wait, reconnect) and perform a 15‑mile drive to confirm proper sensor calibration.
Identify Why Your Accord Trunk Won’t Close
Why won’t your Accord’s trunk close? An open short on the ground wire near the latch hinge cuts power to the remote and interior switch when the trunk is partially closed, so the actuator never receives voltage. The fault appears intermittent—works fully open, fails halfway. Repairing the damaged wire restores both remote and switch operation, eliminating the dash‑open light. The issue may also stem from a faulty actuator that does not engage even when voltage is present. Excessive suspension movement or body rocking can sometimes shift wiring or latch alignment and contribute to intermittent trunk closure problems.
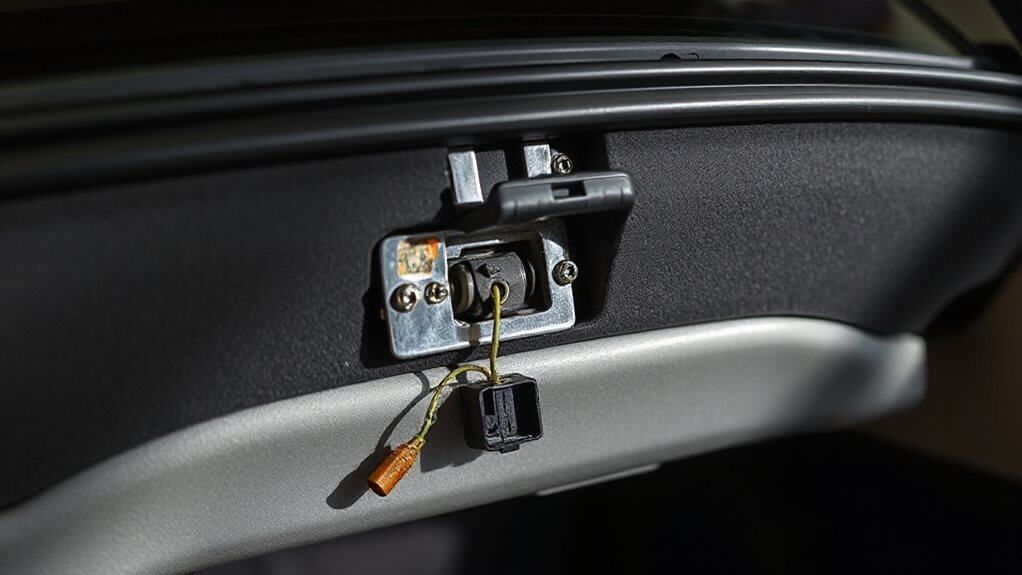
Understand How the Trunk Latch Mechanism Works
When the trunk won’t close, the problem often lies in the latch mechanism itself, which is why fixing a broken ground wire only addresses part of the issue.
The stainless‑steel latch hooks onto the lid via two 10 mm bolts and a metal bar that links the lock cylinder.
A five‑pin connector, secured by a colored plastic clip, powers the actuator.
Release the clip, disconnect the connector, and twist the latch 45° to detach it.
Reinstall by reversing these steps, ensuring the bar and clips align before testing manual and powered operation.
Regular inspection of related components and blower motor function can reveal additional issues affecting closure and operation.
Test the Trunk Sensor for Faults
Ever wonder why the trunk‑open indicator stays lit even though the lid appears shut? Open the trunk, manually shift the latch bar to its “off” position, and watch the dash light. If it stays on, the sensor is faulty. Listen for actuator clicks when you press the remote; no click when partially closed signals a bad switch. Check ground wires for continuity, and compare sensor signals when the trunk is fully open versus partly closed. If the light persists, replace the sensor or consult a dealer. Persistent electrical faults can sometimes be caused by a failing sensor that also affects other systems, such as ground continuity.
Reset the Main Trunk Switch When Unresponsive
If the trunk sensor test shows the indicator staying on, the next step is to address the main trunk switch, which may have become unresponsive. Locate the switch near the trunk controller, set it to “on,” then press the trunk button.
If it still won’t respond, disconnect the gray‑tab connector, wait a few seconds, reconnect, and test again. This reset often restores normal operation. Many BMWs show that electrical faults like a faulty latch actuator can cause similar trunk behavior.
Clear Debris That Blocks Full Latch Engagement
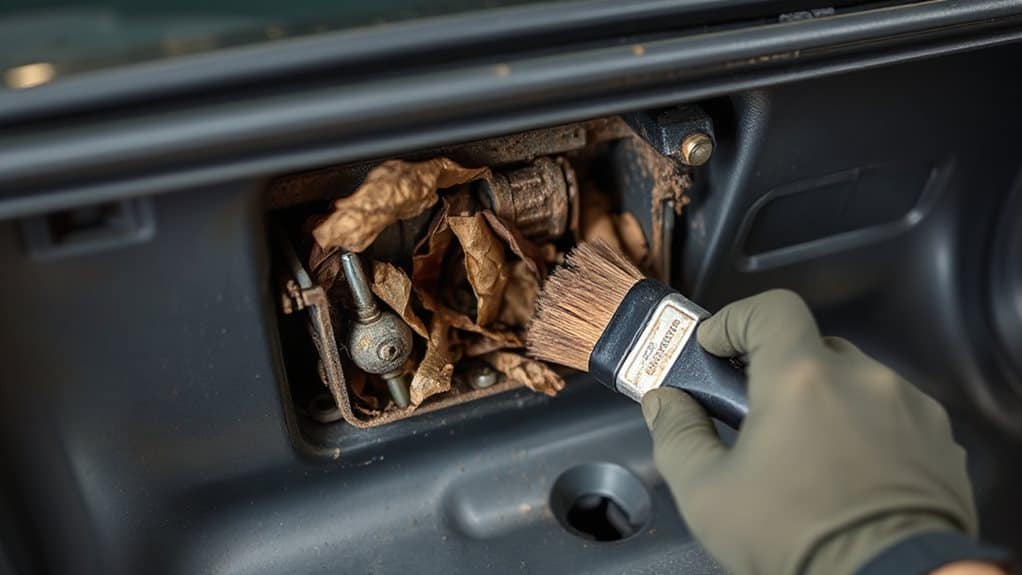
You’ll first remove any latch obstructions by opening the trunk, prying off the lock cover with a flat‑head screwdriver, and manually clearing dust, rocks, or dried lubricant from the tumblers and springs.
Once the debris is gone, operate the latch several times to verify that it engages fully and the latch indicator clicks into the locked position.
Finally, check that the latch striker aligns correctly and that the electronic sensor registers a complete closure before reassembling the cover.
Consider installing properly sized cross bars to avoid roof rack interference with trunk sensors and prevent future misalignments.
Remove Latch Obstructions
Why does the trunk refuse to latch fully? You likely have debris—plastic fragments, carpet pieces, or rubber—blocking the latch. First, pry off the plastic cover using a straight pick and small screwdriver, careful not to damage the two clips.
Then, lift the carpeting, remove any clips, and cut away rubber that hides the latch. Clear all junk, then test the latch before reassembly.
Verify Full Latch Engagement
When debris accumulates around the latch, it can prevent the striker from seating fully, so the trunk won’t stay closed.
Check alignment by looking at the striker and latch jaws; they must meet without gaps.
Cycle the latch manually several times, press the lid firmly, and listen for a solid click.
Verify that the key, remote, and interior lever all produce the same secure engagement.
Stop Key‑Fob Interference Causing False Open Signals
You’ll notice that keeping the key‑fob too close to the trunk can trigger the open‑position sensor, so start by moving the fob at least a foot away during any test. Check that the trunk‑switch wiring is securely connected and free of corrosion, because loose wires can amplify the fob’s radio‑frequency noise and cause false signals. Finally, perform a sensor‑calibration reset by disconnecting the battery for a minute, then reconnecting it to let the control module relearn the closed‑state reference. Note that in some vehicles the control module may be integrated with other systems, so module faults can mimic sensor or latch failures.
Fob Proximity Detection
Ever wonder why your Honda Accord’s trunk sometimes opens on its own? Your fob’s proximity detection relies on a strong, clean signal; a weak battery or corroded contacts can cause intermittent false opens. Test voltage—below 3 V means failure. Replace the battery, clean contacts, and ensure the valet switch is off. If the problem persists, try a spare fob to rule out sensor glitches.
Secure Switch Wiring Connections
Why does a Honda Accord’s trunk sometimes register a false‑open signal even though the latch is fully closed?
The key‑fob’s wireless field can induce noise on the trunk switch wiring if connections aren’t secure. Inspect the 26‑splice and wire braids, tighten junction connectors, and replace corroded pins. Test continuity with a 12 V probe, and ground the probe correctly to isolate any interference. This prevents false open signals.
Sensor Calibration Reset Procedure
After securing the latch wiring and eliminating loose connections, the next step is to reset the trunk‑sensor calibration to stop key‑fob interference that can generate false‑open signals.
Connect the Honda diagnostic system to the OBD port, clear all trouble codes, then initialize the sensor function. Verify communication, set the valet switch “on,” run static calibration, drive 15 miles, and confirm no false opens.
Fix a Trunk Light That Stays On After Closing
Is the trunk light staying on even after you’ve shut the lid? First, verify the latch switch; if it stays closed, the circuit thinks the trunk is open, so the light and dashboard indicator remain lit. Inspect the latch bar for debris or misalignment, ensuring equal gaps on both sides. If wiring looks damaged, cut and zip‑tie the green, black, and ground wires, then test. If the light persists after removing the bulb, replace the latch assembly.
Warranty vs. DIY Repairs for Latch & Sensor Issues

If you’re deciding whether to rely on Honda’s factory warranty or tackle the latch and sensor repair yourself, start by comparing coverage limits, cost breakdowns, and the technical steps involved. Warranty covers genuine OEM latch parts for 2018 Accord, costs $61, and assures fit, but excludes aftermarket parts. DIY saves $95 labor, demands basic tools, fuse checks, and precise adjustment. Professional service guarantees compliance, higher price, and calibrated installation.
Apply Preventive Maintenance Specifically for the Accord Trunk
How often should you tend to your Accord’s trunk to keep it reliable? Check the latch for wear every six months and inspect hinges biannually.
Lubricate the latch, hinges, and striker with silicone‑based spray annually, after cleaning debris.
Replace the key fob battery every two years, test the release button monthly, and vacuum the interior quarterly to prevent obstructions.
Replace tensioners promptly if one fails.
Wrapping Up
By checking the latch, sensor, and wiring, clearing debris, and resetting the trunk switch, you’ll eliminate most causes of a Honda Accord trunk that won’t close. Regularly inspect the latch mechanism and keep the sensor area clean to prevent future failures. If the problem persists after these steps, consider professional diagnostics to rule out deeper electrical issues. Proper maintenance and prompt repairs will keep the trunk operating reliably.


