Edelbrock manufactures carburetors for classic cars and street performance machines with custom headers. Edelbrock carburetors are a popular choice for those looking to upgrade their engine’s performance. A critical aspect of maintaining the performance of an Edelbrock carburetor is adjusting the electric choke.
They offer two basic models that fit many engine sizes made by different manufacturers. To accommodate cold starting requirements where additional fuel is needed, Edelbrock provides a manual choke hooked up to an electric choke design.
The manual choke has a dash-mounted knob that operates a cable to open and close the choke plate to make sure the choke stays closed. The electric version uses an electrically heated coil that expands as it heats to open the plate with the engine running.

As a car enthusiast, you want your vehicle to run at its best, and the carburetor is critical in achieving that. Adjusting the Edelbrock carburetor with an electric choke and fast idle cam may seem daunting, but with a few simple steps, it’s pretty straightforward.
In our guide, you can learn more about your Edelbrock choke adjustment to ensure you have the right idling fuel mixture and exhaust fumes, not being too rich or too lean. By the end, you’ll be able to do this and ensure you hook up your Edelbrock 1406 choke adjustment just right on your Chevy or another model of car you have. (Learn How To Fix A Car Visor)
Understanding the Electric Choke Idle Speed
The carburetor’s electric choke is a part that controls how much gasoline and air are injected into the engine while it is cold. The electric choke closes to reduce airflow when the engine is cold, which forces the engine to consume more fuel.
This gives the engine additional fuel to start and warm up. The electric choke opens once the engine warms, allowing it to function normally. One significant advantage of an electric choke is using a manual choke, you can forget to ensure the choke is closed off.
Running on choke means your carb passes more fuel, and thus your car gets used to using this much and could stall or struggle to start in any conditions without the choke being used.
Steps for Adjusting the Edelbrock Carburetor Electric Choke
Start by ensuring the engine is turned off and the electric choke is hooked up correctly.
- Locate the fast idle screw, which is located on the choke housing. This screw controls the speed at which the engine idles when the choke is closed. You will see factory index marks in the carb housing.
- Start the engine and let it run until it warms to its normal operating temperature. This may take several minutes.
- Once the engine is warmed up, use a screwdriver to slowly turn the fast idle screw clockwise until the engine stalls.
- Turn the fast idle screw counterclockwise until the engine starts and runs smoothly.
- Wait for the engine to warm up and the truck thermostat to be at normal operating temperature.
- Once the engine is warm, adjust the idle speed screw on the throttle body to the desired idle speed.
- Finally, adjust the idle mixture screws, which control the ratio of fuel to air entering the engine running, until the engine runs smoothly at the desired idle speed.
Tip, check the gasket, as a leak can cause the engine to run lean.
Tips for Electric Choke Adjustment
Changing the electric choke can take some time, so be patient. If you run into any problems, consult the Edelbrock carburetor manual details or get in touch with Edelbrock tech support for further additional information.
Look for any vacuum leak or car fuel pump problems, as these can impair the performance of the electric choke. By following these instructions, you ought to be able to effectively modify the electric choke on your Edelbrock carburetor for optimum truck performance.
Your Edelbrock carburetor can continue to deliver the performance you require from your engine by being adequately maintained. Requiring tech support is a last resort, usually for faulty products rather than setting your choke and carb. (Read Why Does My Car Temperature Go Up And Down)
What Is An Edelbrock Carburetor with Electric Choke?
The Edelbrock .1901 AV2 Series 500 cfm Carburetor is matched with an Edelbrock Performer or Performer EPS manifold or any brand of similar design for small cubic-inch single carb applications.

Carb Tuning Procedure
1. Changing Engine Components
Metering Rod and Step-Up changes usually take less than five minutes to change a spring without taking the carburetor apart to tune it. Loosen the step-up piston cover screws first; then, the Step-Up Piston Cover Plates should be twisted to the side.
After you loosen the assembly, the Step-Up Springs and Metering Rods can be removed and changed on your Chevy. When finished, carefully tighten the Step-Up Piston Cover Screw with a hand-held nut driver and replace the Step-Up Piston Cover Plate.
Note: Only 12 to 17 inches/pounds of tightening should be used. The screw heads will weaken or break off if you get the torque setting wrong. In such a case, they might fall into the carb hole and seriously harm the engine, or at least take a while to search and find them.
If an inch/pound torque wrench is unavailable, tighten the screw 1/16th bit more after it barely contacts the plate. Remove the Metering Rods and Step-Up Valve before attempting to replace the Primary or Secondary Metering Jets.
After that, unplug the Choke Connector Rod, Choke Cam Connector Rod, and Pump Connector Rod. The Airhorn should be freed from the carburetor body by removing the 8 Airhorn Attaching Screws. The appropriate Metering Jets can now be removed using a regular flat-blade screwdriver.
The carburetor can be reassembled by following the steps above reverse after the desired Metering Jets have been inserted.
2. Idle Mixture
The traditional Idle Mixture Screws (IMS) on Edelbrock Performer Series, Thunder Series AVS, and AVS2 carburetors produce a richer A/F when turned counterclockwise and a leaner A/F when turned clockwise.
A conventional screw that opens the Primary Throttles regulates the idle airflow. The idle mixture and speeds should be set using the approach below.
- Check that the choke is fully open and warm the engine fully.
- There is an air cleaner.
- With the idle speed screw, adjust the desired speed.
- To achieve the highest RPM, adjust the IMS on ONE side. Don’t accelerate past the point of maximum speed.
- If those above caused the idle speed to vary by greater than 40 RPM, then modify the speed.
- For maximum RPM, make the adjustment on the side opposite of that in Step 4.
- Set the speed back.
- For the maximum idle RPM once more, carefully turn each IMS.
- Just enough weight should be lost to reduce speed by 20 RPM.
- To get the desired RPM, reset the speed.
- A Lean-Best Idle Set is this. Richer settings than this may tend to foul plugs rather than improve the quality or performance of the idle.
3. Choke Adjustment
- Place the fast idle screw A between the two notches on the cam to adjust the fast idle linkage.
- The choke hole valve should be closed as far as it will go without being forced. The distance between the air horn and the choke valve should be 3/64″—bend rod C to adjust.
- During typical choke cold operation, fast idle can be adjusted to the manufacturer’s standards (typically 1500 rpm).
- With the engine off and the throttle kept open to provide access to the screw head, the fast idle screw “A” can be adjusted.
- After each adjustment, recheck the fast idle speed.
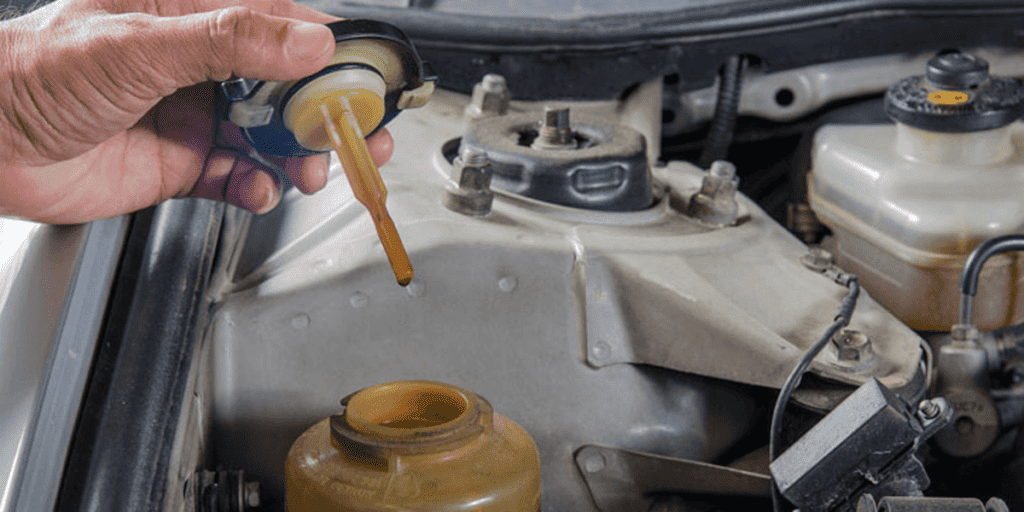
- Depending on where the choke cap is placed, the choke will remain closed for a specific time. The choke stays closed for longer as the choke cap is turned clockwise.
- To adjust the choke correctly, turn the choke cap to the choke housing’s leanest notch, tighten the choke housing retaining screws, and run your engine until it reaches normal operating temperature.
- Turn the choke cap slowly clockwise while the engine is running until the choke valve closes to adjust the timing setting.
- The choke housing should now be turned one notch counterclockwise (LEAN), and the choke housing retaining screws should be tightened.
- The choke must be periodically readjusted as the temperature varies throughout the year.
- Verify that the choke valve fully opens after each adjustment when the engine has warmed up.
Note: In power to heat the inside coil, which expands and contracts to open and close the choke plate, two wires are plugged into the disc.

4. Tuning Procedure
1. Slower Than Base Calibration
Go to 1 stage lean Primaries and 1 lean Secondaries jet and perform acceleration test .3.
- If test .3 is the same as the base calibration, go back to the base calibration.
- If test .3 is faster than base calibration, go to 2 stages and lean on both the Primaries and the
Secondaries jet. Continue going in a lean direction until there is no change or a slowdown, then move back one stage richer to stay with the richer of any two calibration levels with the same power. (Learn How To Reset Service Advancetrac)
2. Same As Base Calibration
The Edelbrock carburetor’s Metering Rod function enables simple part-throttle calibration without affecting the WOT metering.
- Cruise Mode: In this mode, little power is produced, similar to a continuous cruise with low acceleration. Metering Rods are in the lean position, and Manifold Vacuum is high.
- Power Mode: This mode produces much power, similar to a high but not fully-charged acceleration. The Rods are up and in the rich position, and the Manifold Vacuum is low.
The Step-Up feature modulates the Rods between the Cruise and Power positions. The part-throttle calibration is more “individualized” than the Wide-Open-Throttle (WOT).
Rather than being based on precise numbers, it is determined by the driver’s feeling for a particular combination. Thoroughly assess the drivability using the carburetor at the calibration level determined by
Note: Keep an eye out for any flat spots or lean/surge situations while you drive at various engine and throttle settings. Check that exhaust fumes are not too rich or lean, adjust the carb and choke as required, or contact tech support for advice.
Cruising Mode
Lean circumstances occur when steady-speed cruises or light accelerations surge or flat spots.
- Change Cruise Mode to 1 stage rich using the Calibration Reference Chart.
- Keep going rich if it gets better but not fixed.
- You can choose from the Calibration Reference Chart’s directionally correct Rod and Jet combinations.
- If the light throttle works, try going 1 stage lean in Cruise Mode. If there are no surge or other lean metering problems, move to 2 stages lean in Cruise Mode.
- Lean Cruise Mode saves fuel and cleans plugs.
- Keep going until you detect drivability problems, then back up one stage.
Performance/ Power Mode
The Power Mode measures accelerations at partial throttle with low manifold vacuum (less than approximately 5″ Hg on a vacuum gauge).
To prevent spark knock (detonation) and piston/valve burning, don’t calibrate this area of the engine’s operating range too lean. If this mode exhibits any signs of lean drivability (surge or flat spots), it is too lean and needs to be re-calibrated at least one stage richer.