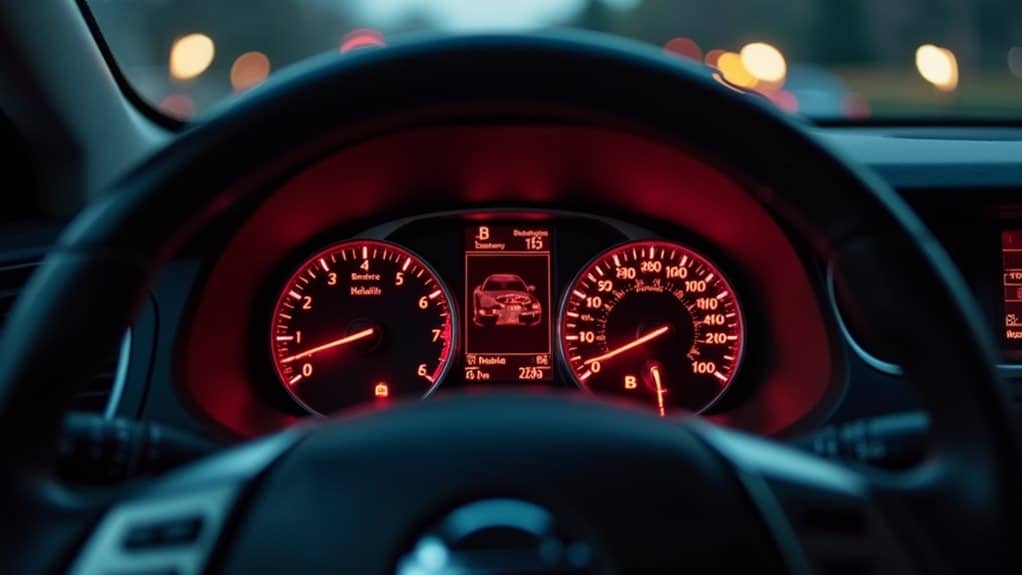
When both your battery and brake warning lights illuminate simultaneously on your Nissan Altima, you’re likely experiencing alternator failure that’s preventing proper charging of your electrical system. The alternator can’t maintain the required 14.0–14.5 volts, causing system voltage to drop below 12.5 volts and triggering multiple warning indicators. You’ve got approximately 10–15 miles of driving range before complete electrical failure occurs, risking stalled engine, disabled power steering, compromised brake assist, and potential safety hazards. This guide covers diagnostic procedures, voltage testing methods, and professional solutions.
Quick Tips
- Both lights typically indicate the alternator is failing to charge properly, causing low system voltage affecting multiple circuits.
- The alternator should produce 14.0–14.5 volts when running; readings below 12.5 volts confirm alternator failure requiring replacement.
- You can drive approximately 10–15 miles before complete electrical failure, but continued driving risks stalling and loss of safety systems.
- Test battery voltage with engine off (expect 12.4–12.7V) and running (expect 13.8–14.4V) using a multimeter to confirm diagnosis.
- Low brake fluid level or parking brake engagement issues can trigger the brake light independently from battery problems.
Understanding Why Both Warning Lights Activate Together

When both your Nissan Altima’s battery and brake warning lights illuminate simultaneously, the vehicle’s computer has detected critical issues that require immediate attention.
Most commonly, this indicates your alternator isn’t charging properly, causing low voltage throughout the electrical system. The brake light activates because insufficient power affects shared electrical circuits. A bad alternator is typically the root cause of this dual warning light scenario. Additionally, a faulty starter motor can exacerbate electrical issues, leading to further complications if not addressed promptly.
You’ll likely experience gradual power loss, giving you approximately 10-15 miles before complete electrical failure occurs.
Alternator Malfunction as the Leading Culprit
When your Nissan Altima’s battery and brake warning lights illuminate simultaneously, a failing alternator is often the root cause, as it can’t maintain the 14.0–14.5 volts needed to power your vehicle’s electrical systems and recharge the battery. A malfunctioning alternator may also lead to engine misfire due to insufficient power reaching the spark plugs.
You’ll need to test the alternator’s voltage output at the battery terminals with the engine running, check for voltage drops exceeding 0.5 volts across connections, and inspect the drive belt for wear or looseness. Catching alternator problems early prevents complete battery drain, engine stalling, and the cascade of electrical failures that leave you stranded.
You may also notice your headlights appearing dimmer than usual or flickering intermittently, which indicates the alternator isn’t producing enough power to meet your vehicle’s electrical demands.
Detecting Alternator Power Loss
As your Nissan Altima’s alternator begins to fail, you’ll notice a cascade of electrical problems that distinguish this malfunction from a simple dead battery. Your headlights will dim noticeably, and the dashboard battery light illuminates.
Test voltage output at the battery terminals—healthy alternators produce approximately 14.5 volts. Readings below 12.5 volts indicate power loss, often caused by worn voltage regulators or corroded wiring connections impeding current flow.
Voltage Output Testing Methods
Suspecting alternator failure requires systematic voltage measurements to confirm the diagnosis and rule out battery or wiring issues.
Start by testing battery voltage with the engine off—healthy batteries read 12.0 to 13.0 volts.
Next, start your engine and recheck voltage at the battery terminals. A functioning alternator produces 14.0 to 14.5 volts during operation, confirming proper charging system performance.
Preventing Complete System Failure
Although many drivers attribute dashboard warning lights to minor glitches, the battery light accompanied by the brake warning indicator reveals a critical alternator malfunction that demands immediate attention.
Your alternator’s voltage regulator has likely failed, dropping output below 12.5 volts. This insufficient charging drains your battery rapidly, risking complete electrical failure. Inspect terminal connections for corrosion, test alternator output under load, and replace faulty components before total system shutdown leaves you stranded.
How to Check Your Battery Voltage and Charge Level
Checking your battery’s voltage and charge level doesn’t require professional skills, just a few basic tools and about five minutes of your time.
You’ll need a digital multimeter set to DC voltage, typically 20 volts for automotive batteries. Connect the black probe to the negative terminal and red to positive. A fully charged battery reads approximately 12.6 volts with the engine off, while 12.4 volts indicates around 75% charge. Regular visual inspections can help identify corrosion buildup early and ensure optimal battery health.
Parking Brake Engagement Check and Electric System Issues

Your Nissan Altima’s brake warning light can stay illuminated due to parking brake engagement issues, which differ depending on whether you have a manual pedal-style brake or an electronic switch system.
If you’ve released the manual parking brake pedal but the light remains on, the release mechanism may not be fully disengaging, while electronic parking brake systems can experience switch malfunctions that prevent proper communication with the vehicle’s computer.
Sensor failures within the electronic parking brake system are particularly common, as faulty position sensors or wiring issues can trigger persistent warning lights even when the brake is physically released. Regular inspection of the sunroof mechanism is vital to prevent unnoticed issues that could lead to warning lights in other systems.
Manual Parking Brake Release
Understanding how to properly release your Nissan Altima’s manual parking brake prevents potential brake damage and guarantees safe vehicle operation.
First, shift to Park and firmly press the brake pedal with your right foot.
Then, press the parking brake pedal again with your left foot.
Confirm the indicator light turns off completely before driving, as an illuminated light signals incomplete release requiring immediate inspection.
Electric Brake Switch Malfunction
While releasing the parking brake manually requires straightforward physical steps, problems with the electric brake switch introduce a more complex layer of potential failures that can affect multiple vehicle systems.
This switch, located near your brake pedal, monitors parking brake status and controls brake light activation. A faulty switch or short circuit can falsely signal engagement, keeping your brake light illuminated even after release, requiring diagnostic assessment.
Sensor Failure and Diagnosis
When the brake warning light refuses to extinguish despite releasing the parking brake, the underlying cause typically traces back to one of several sensor or electrical system failures that require systematic diagnosis.
Start by checking the parking brake switch for corrosion or damage, then inspect the brake fluid level sensor. Test electrical connections with a multimeter, verifying voltage supply and continuity. Scan for ABS fault codes to identify specific sensor malfunctions requiring replacement.
Inspecting Brake Fluid Level in Your Reservoir

Regular inspection of your Nissan Altima’s brake fluid reservoir helps you catch potential problems before they compromise your vehicle’s stopping power.
Locate the reservoir behind the airbox on the driver’s side, then wipe debris from the cap before removing it counterclockwise.
Check that fluid reaches between the maximum and minimum lines, and verify it’s clear to amber-colored rather than dark, which indicates breakdown.
Identifying Faulty Sensors in the Brake System
Because your Nissan Altima’s brake system relies on several sensors to communicate critical information to the vehicle’s computer, identifying when these components fail is essential for maintaining both safety and functionality.
You’ll notice symptoms like brake lights that won’t illuminate, inability to shift from park, or starting problems.
Test the brake light switch using a multimeter to verify 12-volt output when pressing the pedal, checking for continuity and proper electrical signals.
Testing the Alternator Before Replacement

Before you spend money on a new alternator, you’ll need to run specific voltage output tests using a digital multimeter to confirm the charging system has actually failed.
Start by measuring your battery’s rest voltage with the engine off—you should see 12.4 to 12.7 volts—then check charging voltage at idle, which typically ranges from 13.8 to 14.4 volts on a healthy alternator.
If your Nissan Altima has an internally regulated alternator or uses variable voltage control through the ECM, you may benefit from professional diagnostic equipment like the CONSULT III Plus scanner, which can disable electronic regulation temporarily and monitor alternator duty cycle for more accurate testing.
Voltage Output Test Procedure
Testing your Nissan Altima’s alternator through systematic voltage measurements can save you from replacing a component that’s actually working fine.
Start by measuring battery voltage with the engine off—expect 12.4–12.7V.
Next, start the engine and check for 13.8–14.4V at idle.
Finally, rev to 2,000 RPM while activating headlights and climate control; voltage should stay in the mid-13s to mid-14s range.
Signs of Alternator Failure
After you’ve confirmed your alternator produces the right voltage numbers, you’ll want to recognize the warning signs that appear before complete failure occurs.
Watch for dimming headlights that suddenly brighten, flickering dashboard gauges, or slow engine cranking during startup.
Your battery warning light may illuminate, and you might experience erratic electrical behaviors.
Nissan Altimas with 40–60-amp alternators commonly show voltage regulator fatigue around 80,000 miles.
Professional Diagnostic Equipment Options
When you suspect your Nissan Altima’s alternator is failing, professional diagnostic equipment can pinpoint the exact problem before you spend money on unnecessary replacements.
OE-level scan tools provide all-encompassing electrical system analysis, while automotive lab scopes test voltage ripple and waveform signals.
Dedicated battery and charging system testers measure output under load conditions.
These tools use live data streaming, bi-directional controls, and OBD-II compatibility to verify alternator performance accurately.
Brake Pad Wear Indicators and Warning Triggers
Understanding how brake pad wear indicators function on your Nissan Altima requires familiarity with their strategic placement within the braking system.
The inboard pad typically receives the wear sensor, positioned at the leading edge where wheel rotation guarantees optimal rotor contact.
When friction material depletes to 2-3 millimeters, mechanical squealers activate, creating audible warnings.
Front sensors mount on top, while rear sensors attach below, corresponding to rotation direction.
What Happens When You Continue Driving With Both Lights On
Recognizing brake pad wear indicators serves as your first line of defense, but ignoring the simultaneous illumination of both battery and brake warning lights converts a manageable repair into a critical safety emergency.
Your alternator’s failure drains the battery, disabling power steering and brake assist systems. The ABS won’t function properly, and your vehicle may stall unexpectedly. You’ll face expensive repairs, potential accidents, and roadside breakdowns if you continue driving.
Professional Diagnosis Tools and When to Visit a Mechanic

Although your Nissan Altima’s dashboard lights provide basic warnings, professional diagnostic tools reveal the specific fault codes and system data necessary to identify the root cause of simultaneous battery and brake light illumination.
Bluetooth OBD2 scanners connect wirelessly to read fault codes, monitor alternator output, and check ABS systems.
Visit a mechanic immediately when both lights appear together, as this indicates potential charging system failure affecting critical brake safety components.
Wrapping Up
When your battery and brake lights illuminate simultaneously, you’re dealing with an electrical issue that requires prompt attention. The alternator typically causes both warnings, since it powers your vehicle’s systems and charges the battery. Don’t ignore these indicators—continued driving risks complete power loss and potential brake system complications. Check your battery voltage, inspect fluid levels, and test the alternator. If you’re uncertain about diagnostics, visit a qualified mechanic immediately to prevent roadside breakdowns and guarantee your safety.