
Park on a level surface, turn off the engine, and wear gloves and safety glasses. Open the translucent reservoir with its blue cap and check the fluid level against the markings. Attach a thin clear tube to the nozzle spray or a wet‑dry vacuum, then activate the pump while aiming the spray into a 2.5‑liter bucket; the fluid will flow out quickly. If you prefer, disconnect the hose at the reservoir inlet and let gravity drain the fluid into the bucket. After the tank empties, cap it securely, dispose of the fluid per local hazardous‑waste rules, and inspect nozzles for debris. Continuing will show you how to keep the system clog‑free and ready for winter.
Quick Tips
- Park the car on a level surface, turn off the engine, and remove the translucent washer‑fluid reservoir cap.
- Attach a thin clear tube or a wet‑dry vacuum hose to the reservoir’s inlet, sealing the connection with a clamp.
- Activate the vacuum or pump to draw the fluid into a large jug, keeping the reservoir upright to avoid spilling.
- Once the fluid stops flowing, cap the reservoir, disconnect the tube, and dispose of the collected fluid per hazardous‑waste regulations.
- Verify emptiness by testing the spray; no output confirms the reservoir is fully drained.
How to Drain Windshield Washer Fluid – The Essential Steps
Where do you begin when you need to empty a windshield‑washer reservoir? First, park on a level surface, turn off the engine, and wear gloves and safety glasses. Activate the wipers and spray lever repeatedly, pausing occasionally to avoid motor overheating, until fluid drains through the nozzles. Locate the translucent plastic jug near the front of the engine bay. Alternatively, remove the hoses or disconnect the pump and drain plug, directing fluid into a prepared container. Rinse the reservoir, then refill using a funnel. Using penetrating oils like WD-40 on or near brake components can be hazardous and should be avoided.
Choose the Best Drainage Method for Your Vehicle’s Design
Which drainage technique suits your vehicle’s layout? If your washer system integrates a nozzle you can activate from the driver’s seat, the Nozzle Activation method empties the tank with minimal tools.
For models where the hose is accessible under the hood, the Hose and Cloth Extraction works well.
Vehicles with removable motor‑mounted tanks benefit from Direct Tank Access, while a wet‑dry vacuum offers the fastest removal for larger reservoirs.
Choose the method matching your design to avoid component damage. If you’re unsure whether electrical issues like a half-hot outlet affect powered pump operation, inspect wiring connections or consult a professional.
Gather Tools and Safety Gear for Draining Windshield Washer Fluid
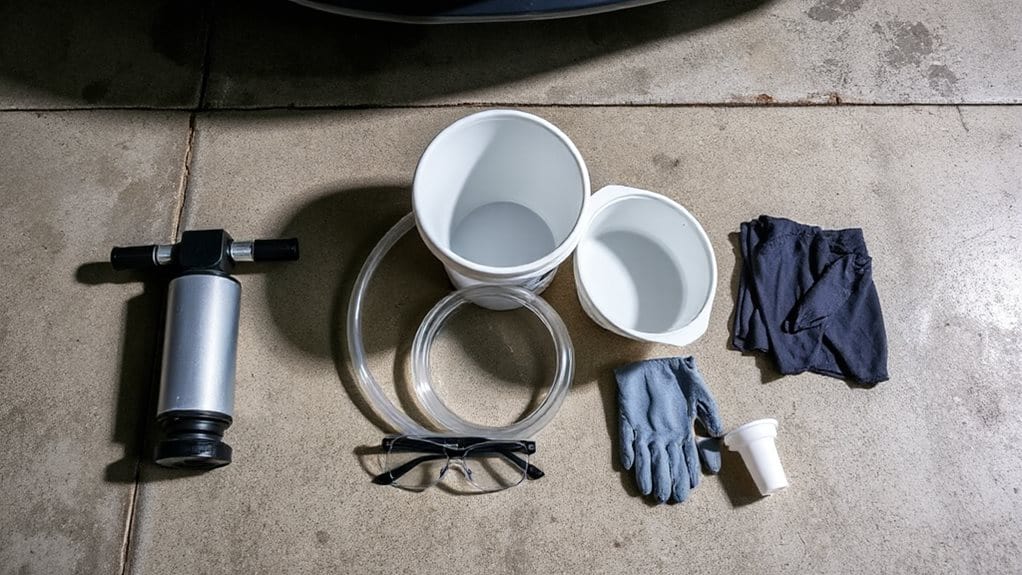
Before you start draining the washer fluid, gather the necessary tools and safety gear to protect yourself and keep the process efficient. Wear protective gloves and safety glasses to avoid skin contact and eye splashes. Use a large jug or 2.5‑liter bucket for collection, and have thin clear tubing, a turkey‑bastern, or a wet‑dry vacuum ready. Closed‑toe shoes prevent spill injuries. Consider using high-quality replacement parts like OEM-equivalent belts as an analogy for choosing durable components when servicing vehicle systems.
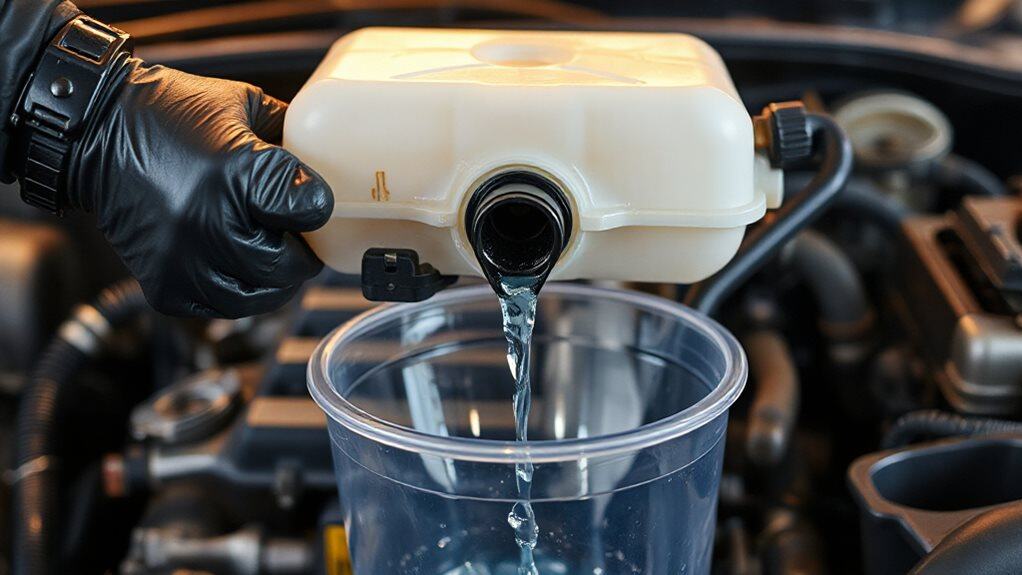
Locate the Windshield Washer Fluid Reservoir and Inspect the Level
Ever wondered exactly where the windshield washer fluid lives and how to check its level? Open the hood on a flat surface, locate the translucent white reservoir near the engine’s rear or front fender, and identify the blue cap with a spray‑icon. Remove the cap, look through the semi‑opaque container for graduated markings, and note whether the fluid is above or below half. Re‑cap securely. Regular vehicle maintenance, including checking hydraulic fluids like clutch fluid and inspecting for leaks, helps prevent larger system failures.
Drain via the Nozzle Spray (Nozzle‑Activation Method)
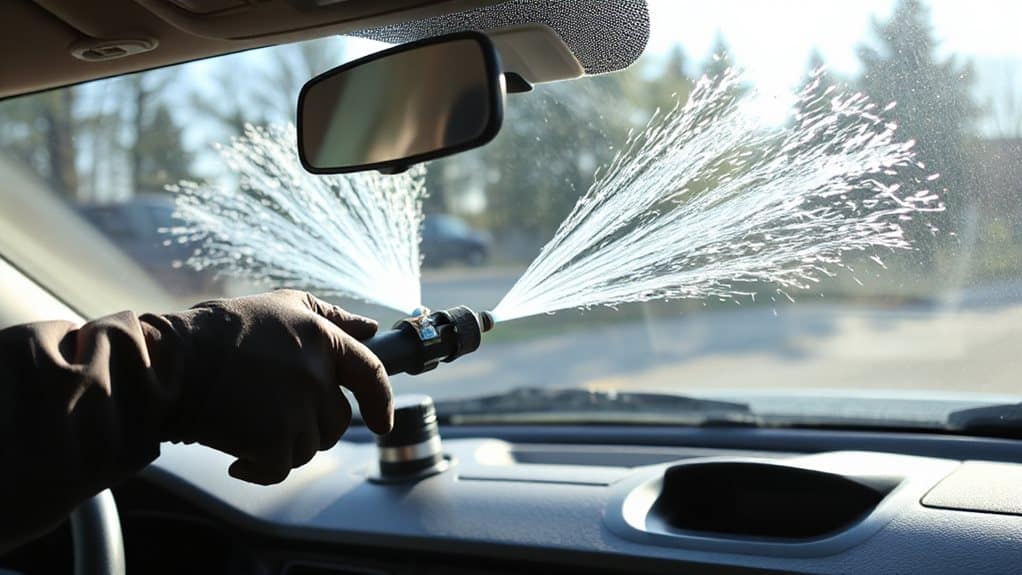
How can you drain the washer fluid without removing the reservoir? Position yourself behind the steering wheel, turn the ignition on, and engage the wiper lever or automatic atomization mode. Hold the lever continuously to keep the pump running, allowing fluid to spray from the hood nozzles. Pause periodically to let the motor rest, preventing overheating, and watch the spray to confirm complete drainage. Properly adjusted components, like an electric choke, help ensure reliable engine idle during the procedure by preventing rough cold starts and stable operation.
Detach the Washer Hose for a Quick Pull‑Out (Hose‑Disconnection Method)
After you’ve emptied the fluid by spraying through the nozzles, the next step is to pull the hose out directly from the reservoir.
Locate the hose clip at the reservoir inlet, pry it with a pick, and squeeze the tabs using two small screwdrivers.
Pull the hose straight out, tilt it into a bucket, shake to release remaining fluid, then cap the reservoir promptly.
Be careful when working near the vehicle’s front end to avoid contact with components like the battery and starter that can mimic other issues.
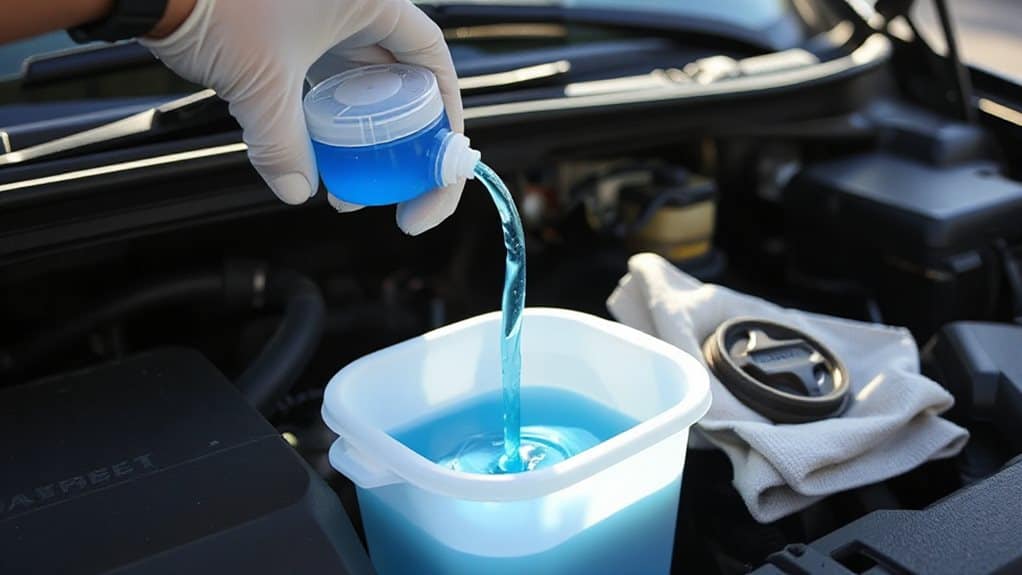
Take Out the Pump to Drain Straight From the Tank (Pump‑Removal Method)
Where can you start the pump‑removal method? Begin by jacking up the driver’s side front, removing the wheel‑well splash shield, and positioning a bucket beneath the pump. Disconnect the electrical connector and both output hoses, then pull the rubber grommet or unscrew the pump from its bushing. With the pump out, tilt the vehicle if needed, letting fluid flow directly into the container for complete drainage.
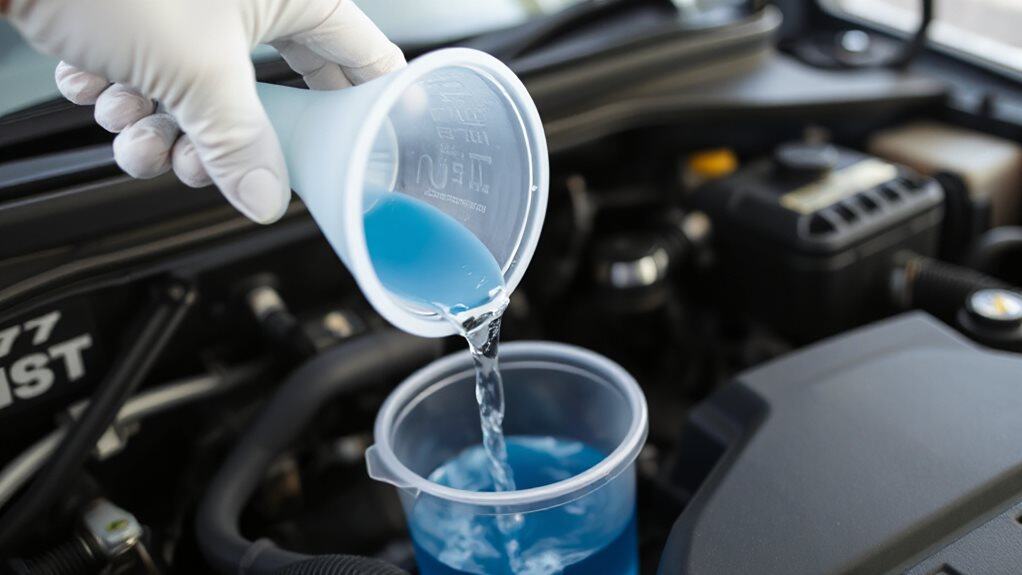
Vacuum‑Extract Fluid Without Disassembly (Vacuum Extraction Technique)
You’ll start by selecting a vacuum that provides enough suction power to pull fluid through a two‑foot tube, then insert the hose so its tip sits just above the reservoir’s bottom while keeping the other end sealed to prevent air leakage.
Positioning the hose correctly creates a pressure differential that draws the washer fluid out without removing the battery or disassembling the tank.
Finally, you secure a tight seal around the reservoir opening, which ensures the vacuum maintains its efficiency and the fluid drains cleanly into your collection container.
Choose Vacuum Type
Which vacuum type should you pick for a quick, mess‑free windshield‑washer fluid extraction without taking the reservoir apart? A wet‑dry vacuum works best; it attaches directly to the cap opening, pulls fluid fast, and captures it in a collection container, preventing chemical mixing. Manual siphon pumps and drill‑driven impeller attachments are alternatives, but they require more handling and may be slower. Use gloves, keep the engine off, and dispose of fluid responsibly.
Position Hose Correctly
A properly positioned hose is the key to a clean, efficient vacuum extraction of windshield‑washer fluid without taking the reservoir apart. Drop the intake hose straight to the reservoir bottom, ensuring the tip contacts the lowest point to eliminate air pockets and splashing.
Place the collection container lower than the reservoir, keeping it stable and matching its volume.
Align the outlet hose so fluid flows directly into the container mouth.
Seal Reservoir Efficiently
When you seal the reservoir for a vacuum‑extraction drainage, the goal is to keep the system airtight while allowing the hose to draw fluid without opening the tank. Use a ¼‑inch threaded nipple on the output port, attach a 2‑inch hose segment, and secure the inlet tubing with a clamp. Verify the seal by listening for air leaks, then engage the HVAC vacuum pump or portable unit. The pressure‑resistant construction maintains integrity, preventing contamination and ensuring complete fluid removal.
Typical Draining Mistakes and Simple Fixes
You might forget to wear gloves and eye protection, which leaves you exposed to harsh chemicals and possible splashes.
If you pressurize the washer system too much, the pump can overheat or burst, causing leaks and costly repairs.
Also, disposing of the old fluid incorrectly violates environmental regulations, so always follow local hazardous‑waste guidelines.
Forgetting To Use Protection
Why do many people skip protective measures when draining windshield‑washer fluid? You risk skin irritation from antifreeze, inhaling fumes, and contaminating clothing if you don’t wear gloves, goggles, and a mask. Proper PPE prevents toxic exposure, avoids accidental spills, and keeps residues off your hands.
Always seal collected fluid in a hazardous‑waste container, then dispose of it at a certified drop‑off point.
Over‑Pressurizing The System
What happens when pressure builds up inside the washer system while you’re trying to drain it? Excessive pressure forces fluid through weak points—kinked hoses, clogged nozzles, or cracked Y‑fitters—causing lateral sprays, puddles under the car, or no discharge at all.
To avoid this, disconnect hoses at the Y‑junction before activating the pump, thaw frozen lines with engine heat, and clear debris from nozzles and reservoirs.
This releases pressure safely and prevents damage.
Ignoring Proper Disposal Guidelines
After releasing the pressure at the Y‑junction, the next step is to deal with the fluid you’ve just drained. Pouring it down a drain contaminates water supplies, harms wildlife, and violates hazardous‑waste rules, risking fines. Dumping containers in regular trash releases toxic methanol vapors and leaks in landfills. Instead, seal the original container, label it, and bring it to a local hazardous‑waste collection point.
Check the Tank for Remaining Fluid After Draining?
First, ensure the vehicle sits on a level surface so the fluid level reads accurately; then visually inspect the translucent reservoir, looking for any liquid against the side or at the bottom.
If you see a faint line or droplets, the tank isn’t empty.
Remove the cap for a closer look; any residue indicates incomplete drainage.
Verify by testing the spray; no output confirms emptiness.
Keep the Washer System Clog‑Free – Post‑Drain Maintenance
After you finish draining, check each nozzle with a needle or thin wire and clear any debris, then rinse with warm water and a toothbrush to keep spray patterns consistent.
Inspect hoses for cracks or blockages, blow compressed air through them, and replace any damaged sections immediately to preserve fluid flow.
Finally, test the pump’s electrical connections and power, and refill with the proper washer‑fluid mix to prevent clogs and ensure reliable operation.
Clean Nozzles Regularly
If you let debris build up in the windshield‑washer nozzles, the spray pattern will deteriorate and the system can fail completely. Inspect each nozzle monthly; look for particles or mineral crusts. Soak clogged tips in white vinegar for a few hours, then swish gently. Use a pin or needle to dislodge surface debris, followed by compressed‑air bursts to expel loosened material. Realign any mis‑directed nozzles to restore proper coverage.
Replace Damaged Hoses PromptInspect Pump Function Periodically
Ever wondered why a windshield‑washer system suddenly loses pressure after a drain? Inspect hoses for cracks, kinks, or wet spots, then disconnect and replace damaged sections with manufacturer‑specified tubing. Secure connections, test for leaks, and verify pump activation by listening and checking pressure.
Periodically examine pump electrical contacts, fuse, and output every 3‑6 months, especially after fluid changes, to ensure reliable operation.
Use Proper Fluid Mix
Inspecting hoses and pump function gets the system back to working order; now it’s time to focus on the fluid itself. Follow the manufacturer’s dilution ratio—don’t replace concentrate with plain water, because water lacks cleaning agents and freezes. Drain any residual water completely, then fill with antifreeze‑rated fluid suited to your climate. Add winter formula over existing fluid if needed, and test the spray to flush old residue.
After Draining: Choose the Right Winter‑Ready Washer Fluid
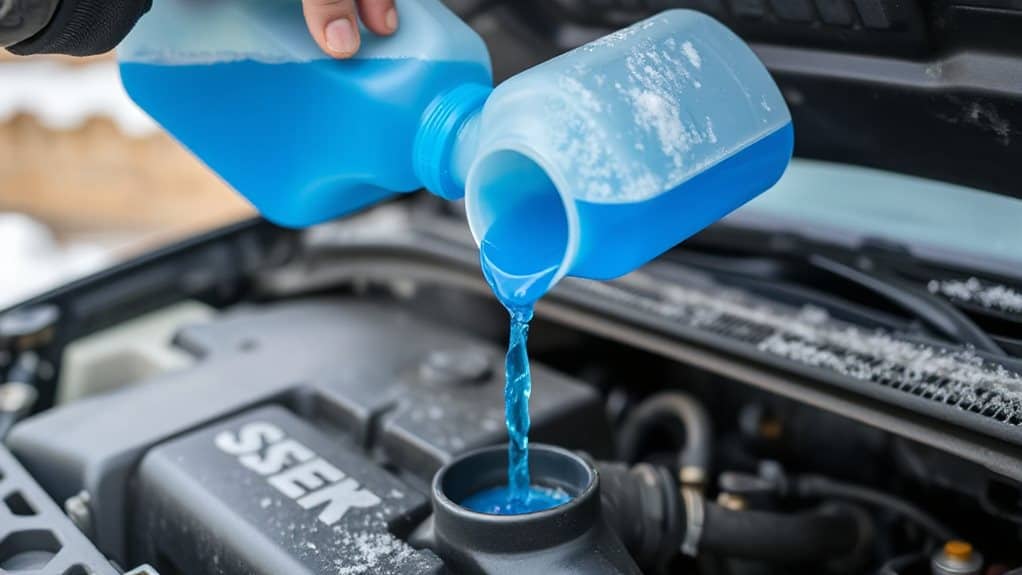
What should you look for when picking a winter‑ready washer fluid after draining the old reservoir? Choose a formula with high methanol or ethanol concentration, which lowers the freezing point to –30 °C or lower, and includes propylene glycol for anti‑crystallization. Ensure it contains surfactants for salt and grime removal, softeners to protect hoses and wiper blades, and biodegradable components that won’t damage paint, chrome, or plastics. Empty the summer fluid completely before filling.
Wrapping Up
By following these steps you’ll efficiently remove old washer fluid, prevent clogs, and prepare the system for seasonal fluid. Inspect the reservoir, use the nozzle‑activation method, and verify the tank is empty before refilling. Maintain the lines with occasional flushing to avoid buildup. Finally, select a winter‑ready fluid with appropriate antifreeze properties to ensure reliable performance in cold conditions. This systematic approach safeguards the washer system and extends its service life.


